Showing posts with label Herbs. Show all posts

All About Herbs

Herbs and spices are special and so necessary. Since the dawn of man, herbs have made the world turn round. Man started observing wild animals consuming herbs and once domestication began, they witnessed them using herbs for healing and noticing milk changing and meat tasting like the herbs they'd consumed. Wow, humans are so smart!

Herbs are used for many many things, for health, for cleaning and disinfecting, preserving, for flavor and for religious rituals. Obviously I'll be focusing on the flavor ad health aspects of herbs. I think they are truly important.  There are four major groups that utilize herbs and they use them very distinctively different. Chinese, European, Ayurvedi or Indian and Native American.

The Chinese use herbs and spices for medicine, and we owe our medicinal knowledge to them and their creation of agriculture. While the Chinese don't cook much with many herbs, they consume them whole or mixed into their teas and hot drinks. East Indians use it for their whole identity. Everything iconic about East Indian cooking is spice and herby and full of flavor. Europeans usage of herbs and spices is how we identify our flavor profiles. We are the most comfortable with a European and Mediterranean approach to flavoring our foods. Most combinations stay relatively the same. Simon and Garfunkel didn't get it wrong when they sang parsley, sage, rosemary, and thyme for those savories and cinnamon, cardamom, garlic, bay and clove. Once the Mediterraneans jumped in and offered some help did their flavor profiles wake up with mint, caraway, allspice, basil and various peppers. Native Americans are even more medicinal like the Chinese. Rarely do they use spices and herbs for their cuisine traditionally, but when they did, they utilized sumac, file or sassafras, wintergreen, wild ginger, oak and acorn. I love that! This world is an amazing place, and it's humans are so inventive and adaptable.

Fresh herbs are best used fresh. Proper storage will help in prolonging their life. They shouldn't be stored for more than 2 days. Delicate varieties like cilantro and basil should be first wrapped in damp paper towels before they are placed in bags for storage in the fridge.
To dry herbs, hang them up by their stalks to dry in a cool place. Drying them concentrates their flavors and can be stored for up to a year. You can freeze herbs easily in ice cube trays with water or oil and then dropped directly into sauces or curries straight from the freezer.
It's not practical to store your herbs in the freezer or fridge, but certain spices are doable. Basil, cilantro, ginger, peppercorns, coffee and cinnamon.

Every kitchen should contain basil, sage, thyme, oregano, bay, cinnamon, parsley, mint, chervil, dill and coriander and either red pepper or cayenne. I didn't list rosemary, wanna know why? Think back to the last time you used straight up rosemary. Unless you were cooking a lamb, probably not. A blend with rosemary, garlic, onion and various peppers is pretty much all you'll need. Try an Italian blend. I know it's hard to buy spices in expensive small quantities. Unless you're a spice guru then you don't need large quantities. You'd be surprised the difference in flavor of new spice and old.
Growing herbs is easy. You hear everyone tell you that all the time. It's really true, but there are a couple of things that everyone needs to know to avoid those pitfalls or frustrations. Most people say, "well you just need a sunny window". Well, that is true, but you need to have morning sun, not all day long direct sun. Here are a few tips I think will help you in choosing the right varieties and getting started. 

-Seeds not necessary: When you first start out trying to grow fresh herbs, I recommend you begin by trying to grow from seedlings rather than planting your own seeds. These great little starter plants are widely available in grocery stores in the late spring. For the same price as a packet of fresh herbs from the produce section, you can buy your own little starter plant. Lots can go wrong in the seed to seedling transition (including not thinning out plants properly), so its probably best to begin by skipping that complicated task or you are in danger of washing out before you really begin.

-A Variety:I recommend you start by trying to grow fresh basil first. It is the perfect trainer herb. First, basil grows quickly, allowing you to observe the effects of your care more easily. Second, basil leaves wilt visibly when not watered enough, but recovers well if you water the wilted plant. This makes basil a great ‘canary in the mineshaft’ to help you figure out how much water is enough. 

-Herbs are like houseplants? NO!  Water herbs a moderate amount every day. While some houseplants flourish with one solid watering per week, most delicate herbs require moderate and regular watering. This is particularly true during hot summer months. If you have good drainage at the bottom of your pot (at least a drainage hole, possibly rocks beneath the soil), it will be difficult to water herbs too much. 

-To cut or not to cut: It may seem like your puny little plant just isn't ready for a trip to the barber, but then you will find yourself sitting there wishing for leaves without much success. Again, basil is a great herb to practice pruning. As with all herbs, you want to cut the herb just above a set of growing leaves. With basil, when you cut the plant that way, the originally trimmed stem will no longer grow. However, two new stems will grow around the original cutting, creating a “V” shape. If you don’t trim basil aggressively, it will continue to grow straight up, and become too tall and top-heavy. Making your first trim approximately 3-4” above the soil produces a nice sturdy plant. Of course you want to be sure you are always leaving a few good sturdy leaves on the plant (see below). As it continues to grow, continue to prune it approximately every 3-4" for a nice solid plant. I like to let it grow for some time and then cut back to within 2-3 inches of the original cut. After only a few early trial cuts, this usually makes for a nice clipping with plenty of basil to use for a pizza. 

-Plant food? Tired soil that has been sitting in your garden or lawn for ages often looks grey and a little depressing. Would you want to grow in that stuff? Give your plants a dose of the good stuff and they'll thank you for it. I grow my herbs in a combination of potting soil, coffee grounds and compost. Miracle grow is very useful. 

My #1 tip is plant with your littles. They love getting their little hands dirty, they will listen and learn a lot more than you think they will and it's good quality time you get to spend with them. When we finally moved to an actual house with a yard, one of the first things I wanted to do was plant with my child. It was like a fairy tale dream to finally get him out there with shovels and starter plants. We talked about garden fairies giving love to the plants, and thinking about all the wonderful foods we were going to make with whatever grew. I knew that my child felt special and learned something valuable. He always talks about his sweet 100's and it always makes me smile. I am grateful that at his elementary school they have a community garden and they teach the children how to grow different herbs and vegetables and helps to reinforce the things I'm teaching at home. So don't forget, they are great diggers and great at watering too. 

And remember, herbs like oregano, rosemary, thyme, coriander, parsley etc can all be transplanted outside at the end of the summer season. They'll be happy to pot up in spring and make you look like you're a garden expert. Remember, when planting in the ground, do not place dill or rosemary next to the delicate varieties like basil, chervil, parsley and chive. Dill and rosemary will overtake those herbs and become so huge you're jaw will drop. I choose to keep rosemary and dill in pots so they don't cross pollinate or go cray cray.  I also don't recommend planting mint near your other herbs. Plant it in walk ways, small planter boxes or next to sidewalks, it will thrive.


One of the best ways to use herbs and spices is freezing them in ice cube trays. You can use either olive oil, coconut oil, water, or even bouillon and butter*. 

You can mix the herbs, or keep it to one variety. I recommend keeping some individual frozen basil alone not mixed with anything else.  Once the herbs are frozen, place them into plastic bags and label them.

Here's some great ways to use these wonderful flavor cubes: 
- Melt a cube in a saute pan before scrambling eggs or making an omelet
- Use them to saute fresh vegetables
- Rub on top of hot corn on the cob
- Slice pats on top of grilled steak
- Saute chicken or fish on the stove-top
- Drop in a pot of homemade soup
- Add to pasta sauces
- Toss a couple with fresh hot pasta or ravioli
- Soften and spread on french bread and broil until golden brown
- Melt on hot baked potatoes
- Toss with roasted vegetables, either pre or post roasting


https://sits-pod10.demandware.net/dw/image/v2/AABF_PRD/on/demandware.static/Sites-Gardeners-Site/Sites-GSC_Products/default/v1428576327978/Products/8589178_002V.jpg?sw=840Have you seen these kitchen tools? 

This one is called Herbsicle  it's $7.95
You simply pack fresh, leafy herbs into the cylinder, twist on the cap and handle and pop it into the freezer. Turn the handle to dispense the frozen herbs, and then grate or cut off just the right amount you need for soups, stews and other flavorful recipes. It's pretty cool and works great.


data:image/jpeg;base64,/9j/4AAQSkZJRgABAQAAAQABAAD/2wCEAAkGBwgHBgkIBwgKCgkLDRYPDQwMDRsUFRAWIB0iIiAdHx8kKDQsJCYxJx8fLT0tMTU3Ojo6Iys/RD84QzQ5OjcBCgoKDQwNGg8PGjclHyU3Nzc3Nzc3Nzc3Nzc3Nzc3Nzc3Nzc3Nzc3Nzc3Nzc3Nzc3Nzc3Nzc3Nzc3Nzc3Nzc3N//AABEIALQAtAMBEQACEQEDEQH/xAAbAAEAAgMBAQAAAAAAAAAAAAAAAgUBBAYDB//EADkQAAEDAwIEAwUGBQUBAAAAAAEAAgMEBRESIQYxQVETYXEiQoGRoRQyUmKx0TM0csHhByNTgvBD/8QAGgEBAQEBAQEBAAAAAAAAAAAAAAECAwQFBv/EACcRAQACAgICAgIBBQEAAAAAAAABAgMRBDESIUFRE2FSIjJDcZEU/9oADAMBAAIRAxEAPwD7igICAgICAgICAgICAgICAgICAgICAgICAgICAgICAgICAgICAgICAgICAgIIPljZ9+RjfU4WZvWO5EsjutbGUBAQEBAQEBAQEBAQEBAQEBB4VFXT0wzPMyP+pyxbJSvcirqeJqGLIi8SY/lGB9V57cukde2fJWVHFFU/IgijiHc+0Vwty7z1Gk8lVU3KuqP4tTIR2BwPkF57ZL27lNq6ecxMLiTk8lxtED6Bw7UGrs9NJncN0n4L63Enywx+nSFovUCAgICAgICAgICAgICDQqrxQUuRJUNLh7rPaP0XG/Ix07lNwp6rirmKSn/7SH+w/dea/N/jCeSoqr1cKnIdUOa0+7H7P6LzWz5L9yzuWicuOScnuVzhBUYQCoKi4T659LT7LVxtO5V1/CVy+z2oxkj+ITv6BevjZZpWY/bUS7VfXaEBAQEBAQEBAQEGpWXKko/5iZrXfhG5+S5XzUp/dKbUdZxTzbRwf95D/YfuvJfm/wAITyUtXc6yrz487i0+6Nh8l5bZb37lncy05XxwxOlme2ONgy5zuQXG1tLEbUU3F1rjk0sbNL+YYAU/rn4b8IWdruVHdWPdSOcHsGXRvG+O6kWnftmaabZXZhgoI5QeFdUeBCSPvO2CxadCj1EnJXNV3bHkU23dZ8tLD6uv0rYgICAgICAgwSAMkoKmu4go6bLYz48nZh2+a8uTlUr6j2nlDnq2+1tVkCTwWH3Y9vrzXiycm9/nTM22rDk7rhuEERj4INS92wXi2upBP4DtYe12MgkdCs9TuW6200rdwVa4Y81bxI7qcleyMuDTW1hRWy32p8rqBhDpBpLieQ7BebJMXtuI1DM2e2UYFRB72sBc44AU2qhrKk1Exd7o5Bcux5A7pI6axU3jUOr85H0C3jx+cbWH05ffbEBAQEBAQVFyv9NR5ZF/vyj3WnYepXly8qtPUe5SZ05mvutXXEiWTEf/ABs2H+V4Mma+TuWJmZaTRk7kADck9AuMzoiNuSuvGBZMYbZGCAceI4ZLvQdFiKXu7RWIa0HEN9BD3iXT2dHt+is8e8fZ6dhb6n7dbIat0YY5+QQORIOMhSsTE6lztD1XVhjKASgiUBUYccBSRTXSr1EwsO3vFc5naq8KCTeakj6BwtDotLCfecSvqcHFvFuftp2y97QgICAg162tgoojJUSBo6DqfRc8mWuON2klyN0v1RW5jizDAdtIO7vUr5uXk3yeo9QxM7VS87Igk3SQ5rxlrgWuHcFZtG1idNaxcO2i3vLnvLt86nNy5evDnx1jVodJna9qJrWyPTDCXn82wXTJzI1qkf8AWVXJIHYa1oaxuzWjkF4vczue2ZnaCqMIIkoGVQOwUFbcqzwm6GH2z9Fzmd+lUucnJUEwoPWnaXytaOZKzI+pWam0W+Jo6BfoMFJpjirToV1aEBAQVd4vMVubobh9QRszt5lebPyIx+o7SZ042qqpq2YyzvL3n6eQXy73m07sx21Zp6em/mZ44/Jx3+S4zkiGopMow11DM7TFVxknvsp+Q8JbD2uYcFdK22zMI5WkMogisFBgnsqMFBHKgzyVGlX1ggZ+Y8gsWsqge90jy5xySsjIQSUFrYaYzVjCRsCuvHp55YgfV6CHRSsb5L78Nw3VFEBBTX+8toGeFCQ6pcNvyDuV5OTyPxx4x2kzpxj3vlkL3uLnuOST1K+XM79y5qjiW6S22CKnpATVVAyCBuG+XmsRWbzqHWsRCttfBd2up8armMYdvjGpy92PhevazZcO/wBPKqBmqGpc5w6Oauk8GuvUp5LGCGalt8MFWczMyDv0ycfRfPmnhea/TNkcrTBlBF0jW/ecAexKCHiO5lrQOgLt0EycbKhlAQaddWNp2b7u6BYmRz80z5nl7zklZVFqCYSRJoycBZHbcIUGZGkjluV9XgYtV85+VfQWDS0AL3tpICCuvdzZbaXXsZXbRt8+/oFw5GaMVf2kzpwU0r5pXSSOLnuOST1Xx5mZncuaIOCoPeKCinq4KiqZmSEFrXeRW8OT8VtzG4biXXU93tkEQDC4ADlpX0f/AG4v2rRuPEjXMLKRmM+8ea8+XmWtGqRomYc3JK6Rxc47leSI0xM7QyqiJc5xLWc+ru3+U7GMBhDGjJPMnr8U38QJ4Dd+vqr6Ec5UDKDUra1lOzu88gszYc/NM+Z5e85JWVRCCTUElJG/bacySBxGRnb1W8WOct/EfT+G6L7PTAuG5X361itdQ1C9VaEHnUTMp4XzSu0sYMuKza0VjykfO7pXyXCsfNJkA7Nb+Edl8TLknJbylzmdtVYQQZQMqhlAJVETnSdPPooMNPuMIxjdWex6Za3luSr/AKECSVBgnCbGhXXBsALWbyfosTKqKSR0ri55JJUAIMhB6BQekERleAPiVB1/DFs8eZr8f7beX7r7PEweFdz2PocEYjjDR0XsluHqoog5TjK4kFlDG788mPoP7/JfO5uX/HDNpcqCvnsJYJ2CbEtDux+SnlC6OSsTEowtDGUBAyqGT3UGFRFzwBk7KbFRX3PnHAfVyxvaqrJccncqjICDOFBNoSR6RsL3AAblZmReWi3OqJWxMGRn2z/Ze/h8eZnzsr6VaKBlJA1oAzhfW6WIWY2UaEEJpGwwvlecNY0uJ8gpaYrG5HzCuqn1dXLO/wC9I4n0XwLWm9ptPy5PMvighdPUPDImDc9/Jc5s1Wu3N1/F0jnmO3xiNvIHGXFWMdrOsRENeG63l51ap8ehXWOJf6NwvrNdpaqZtNWt9t2zX4wc+a5WxWp2kxErOQaThaidw5S81UZVGFRg7KDynnZCzVI7AU2KOtr31BLW+yzt3We1aYGSqNS53eltj2RzNe+Rw1aW9AumPFa8bhdNqhq4K+mE9M4lucEHm09isWpNJ1KPcNWRINJdgLMi2t1E+SQRxjMh5n8P+V6+NxpyT5W6V9G4ftDKOFpLd8L7NYisLEL4DCNMoCCj4vq/s9qMbT7Uzg34cz/7zXj5t/HHr7S0+nBNGXL5Muao4lhqLhc4LZT5EbGB7vUrpx8PnbbtHqHW8N8D01PEx74mlx5ucMlfZx4q1jpJl1bLDStbjQPkuuk0p71YqSla2p0gFjgW+ZXl5lq1wzv5Ij25yZ4c84Xx6x6YntELekFRgpIr625RwZbH7b/oFiZVSzTyVD9UjslBgRlBIDCgq77YmXd0cjZ/AnY3SSW5Dm+a9GDP+L1MbhYnTYsdqbaKV8XjGaSRwc52MAY5ABZzZfy23EEztYtBJwBlcUb9vpnzyhkIy/OC4e7/AJXp43H/ACT5W6H0ThyxspImuc32ue6+xWsVhYdK1oAwq2kgICDieN6jXXRQA7RsyfU/+C+VzrbyRH0xZzYOCCvEytLe6kNZHUTt9sDST3C78bP+G2rR6dO3a09zoPDGKhgx0Oy+nHLwz78leNXxDRQNOh5ld2bsPmuV+djj+33I4+7XeW4S6nH2RsAOQC+bkvbLbyuzNvpXKMCCM88dOzVK7SOg6n0V3oUtbc5J8siGhn1KzPtWhglB6Rt3Cg4+5325Ud7lhy5umTDIcbOb0wOuQvoY+NS+PbWnZubg7jBxuOy+eyBqCbW9SQAOZKD3oKaouU3g0LSGcnzEfovXx+LOSd26H0rhvh6KggYC3cDmeq+vWsUjULEOma0NAACNpICAgIPm3Ek3jXmqd2fp+Wy+HyLeWW0uc9qzK4oyCRyJVE/Fk/EU1C7lguJ5kojAHkglgNYXvcGtHNzjgBUV1XdmMyykbqP/ACOH6D91N/SqiR75nl8ji5x5klB51U8VHSS1M+dEYyccz0Wq1m06geFnulNdopHU7XNdERqa7z5H6Fay4rY59rMN4BckSDnAg9RyPZAwSUB8jIsBxy7o0LVaWv0Li0cN1l2e19U10VP0ZyJ/ZfTwcOI92H0iz2SnoIWsZG0YGwAXv9RGoWIXLWgDZZbSQEBAQEHyqvk8Srmf+J7j9V+ftO7TLm18hZRkKiQQS07FxwGjmTyCo0am6Qw5EI8V/fk0fuptVVUVM1U/Mzy7sOQHwUGlWV9FQSwxVcuh8v3dvqV0rjveN1gbhj0nCwEkUcsT4pmNfG8aXNcNiFYmYncDxoLfR26N0dDAIg85d7RcXfEnK1kyXyTu0m20G99lzHnLPFEPaO6sVm3Q96C3XG7OApYTFEf/AKPH6L24eFa3uTbuuHeCqejLZZwZZur39PTsvpY8NMcel1t2VPSxwtAa0Lcy1ENgABRWUBAQEBAQfIagkyux3X51yQbz3VHu0AN1PIa0e844CsDUqLrBFtA3xXfiOzR+6m1VVTVz1R/3XkgcmjYD4KdjxDHHog9WREbkKiFVb6SrfE+qpY5XRHMZcPurdcl6RMVnsbBbklzj81gRdLEwbnKd9DXNZqfogYXu7MGSulcN7KsaLh673IguZ9njPV3P5L24+DPdjbr7LwJTU5bJODLIPek3+i91MNKdQmpl2NHboadoDGDZdNtRVvBoCy0ygICAgICAgIPmvEduda6s+ID4LyTHIBsfL1Xw8+GcV/0xMKCWtbHnwYtR/E87D4LjuEaU0rp3ap5S4+Z2HwTYgPs45vGU3Az4tO0bAn4Js0iayMcmfMq6t9Lp5PuPQac9hutRjvJpln26pOIKeZ+ezcBd68TJb4PTfpeGrvVkag2IHv7RXqpwP5Sm3QW//T9ryHVb5JT2JwF6q8XFU9ustvC1FRNAjha3H4Qu0aj1C+K7ipIoh7LAFNtae4aAorKAgICAgICAgICDXraWKrgdDOxr2O5hwyFJiJ9SkuGu3BEb3udSPdHnpzH1XC3DxW69MypXcEV2f5nb+hZjg4/sllnA1WfvVL/g1ajhYk9tmHgHP8SSZ3xwukcXFHwe1hT8AUjcF0Wf6iStxixx8GpXNJwlRwY0xMb6NW41HS+K1hs1NHyYnkvi3I6WKMeywBTa6eoaB0TapKAgICAgICAgICAgICAgxgIMaG9ggaG9kGdI7IGAgygICAgICAgICAgICAgICAgICAgICAgICAgICAgICAgICAgICAgICAg//9k=


This one is called Looseleaf Kale and Herb it's also $7.95
You separate your stems and drag them through the holes. This cleanly removes the herbs and woody stalks from herbs and lettuces, kales, collard and chard.


This one is called Prepara Oil Mister it's $15.00
Perfect for seasoning salads, misting cookie trays, grilling meats etc. Simply add desired oil and herb blends, spritz and add flavor to lots of things.


This one is called Joseph compact herb chopper $22.95 
This innovative tool comes with a herb chopper housing unit that doubles as a chopping surface. The herb chopper chopping surface is also slightly concave making it easier to control on the surface as well as keep the chopped foods on the choppers surface. When you are finished chopping it is easy to transport the food to pot, pan, or bowl.

Fresh Fish

How often do you enjoy fish? Is it a regular in your diet?

I'd really love to eat more fish. It's such a versatile yummy food. Fish is so easy to prepare and I've noticed that once you get comfortable with different cooking techniques, it truly becomes a regular in your recipe routine. 

Fish is a high-protein, low-fat food that provides a range of health benefits. White-fleshed fish, in particular, is lower in fat than any other source of animal protein, and oily fish are high in omega-3 fatty acids, or the "good" fats. Since the human body can’t make significant amounts of these essential nutrients, fish are an important part of the diet. What I love about certain types of fish is that they help with cardiovascular health, helps lubricate joints and combat arthritic pain and fish is naturally an anti inflammatory food. The omega-3s also help decrease depression and mental feebleness in the elderly. 

Some of the best choices that give you the best benefits are:
  • wild salmon from Alaska (fresh, frozen and canned)
  • Arctic char,
  • Atlantic mackerel,
  • sardines,
  • sablefish,
  • anchovies
  • farmed rainbow trout and
  • albacore tuna from the U.S. and Canada


Sesame Crusted Halibut 4 servings
2 tablespoons lemon juice
2 tablespoons extra-virgin olive oil
1 clove garlic, minced
Freshly ground pepper, to taste
1 1/4 pounds halibut, or mahi-mahi, cut into 4 portions
2 tablespoons sesame seeds
1 1/2-2 teaspoons dried thyme leaves
1/4 teaspoon coarse sea salt, or kosher salt
Lemon wedges


Preheat oven to 450°F. Line a baking sheet with foil.
Mix lemon juice, oil, garlic and pepper in a shallow glass dish. Add fish and turn to coat. Cover and marinate in the refrigerator for 15 minutes.
Meanwhile, toast sesame seeds in a small dry skillet over medium-low heat, stirring constantly, until golden and fragrant, 2 to 3 minutes. Transfer to a small bowl to cool. Mix in thyme.
Sprinkle the fish with salt and coat evenly with the sesame seed mixture, covering the sides as well as the top. Transfer the fish to the prepared baking sheet and roast until just opaque in the center, 10 to 14 minutes. Serve with lemon wedges.


I found this next recipe on the  living Alaska project website. I adapted it just a little bit from the original, but it's tasty and a quick cook. 

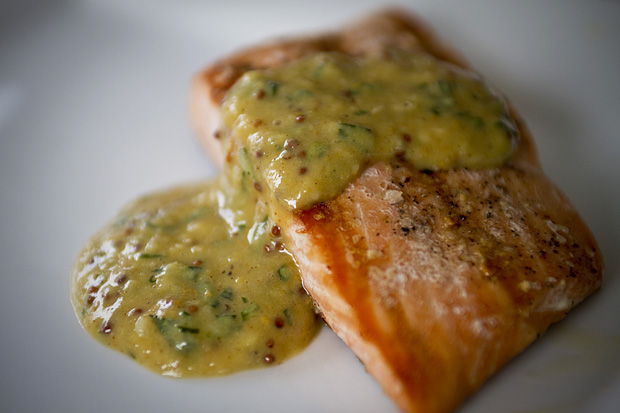
Mustard Encrusted Salmon
4 tablespoons Dijon mustard
2 tablespoons whole grain mustard
2 tablespoons prepared horseradish
3 tablespoons honey
2 tablespoons minced shallot
1 tsp minced garlic
2 tablespoons chopped fresh tarragon leaves
salt and pepper
3-4 salmon filets


You can either grill your salmon on high heat or you can pop the salmon onto a tinfoil lined baking sheet and bake at 400°F until the outside is crisp and browned. Make sure you salt and pepper your salmon. I chose to brush a tiny bit of the mustard mixture on the salmon while it was cooking in the oven, but that's optional.
Combine dijon, whole grain mustard, horseradish, honey, shallot, garlic and tarragon and whisk until combined.  When the salmon is cooked, drizzle your mustard sauce over the top and 

 
My favorite restaurant in town in Franks, they have this Chilean sea bass dish that is amazing. It's not hard to cook at home, it's just a matter of finding a great butcher that has a good cut of Chilean sea bass. I choose to go to The Store in Holladay because I believe they have great prices for their fish. Another great choice is Market Street and Sniders bros meats. Costco also has a great selection of fish if you're cooking for a group.  So here is my go at it. 


Baked Sea Bass
All you need is to season your bass with
Salt
Pepper
Old Bay Seasoning
Olive Oil

Preheat oven to 450 F. Coat fish on both sides with salt, pepper, and Old Bay. Pour some olive oil into a glass baking dish and bake for 15-20 minutes.

 
Compound Butters are easy to make and they have so many uses. Simply mix the cold butter with the herbs and spices, spread butter onto a piece of wax paper and roll into a log, securing tightly with a tinfoil outer wrap. Cut a slice off and top your fish, veggies, or even rice. 


Chive-Garlic Compound Butter
1 cup unsalted butter (2 sticks), at room temperature
2 tablespoons finely minced chives
1 clove garlic, minced
A pinch of Kosher salt


Lemon Lime Pepper
8 tablespoons unsalted butter (1 stick), at room temperature
2 teaspoons finely grated lemon zest (from about 2 medium lemons), zested lemons reserved
1 teaspoon finely chopped garlic (from about 2 medium cloves)
1 teaspoon kosher salt, plus more as needed
1 teaspoon freshly ground black pepper, plus more as needed


Citrus tarragon 
2 sticks unsalted butter, room temp
Zest of 4 clementines, or blood oranges
Juice from the oranges, you'll need 1/2 orange worth
2 Tbsp finely chopped tarragon
Pinch of salt 

Smoked Paprika and Jalapeno
2 sticks unsalted butter, room temp
2 Tbsp paprika
2 jalapenos, pulp and seeds removed, finely minced
salt and pepper

Herby Garlic
2 sticks butter
1 Tbsp each of
parsley
sage
rosemary &
thyme   (you can sing the song while you make this)
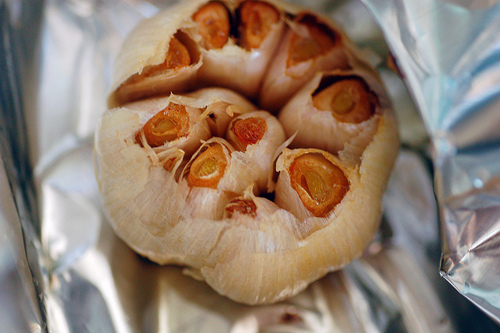
1 cloved of roasted garlic*
1/4 tsp sugar or splenda
pinch of salt and pepper

Roasted Garlic  
http://www.marthastewart.com/973726/how-roast-garlic#973726

Not Just A Culture, A Lifestyle

Mediterranean Continued...

Unlike many other ethnic cuisines, Mediterranean cuisine is not the product of a specific ethnic group or culture.  Rather, it is a label referring to the culinary trends shared by a diverse array of peoples that live in the region around the Mediterranean Sea. The overarching characteristics of Mediterranean cuisine are largely shaped by the climate and geography of the region.  The sunny, mild Mediterranean climate yields an agricultural bounty that heavily influences the vegetable-dominant cuisines of the region. It's more than just good olive oil. 

Fresh vegetables dominate Mediterranean cuisine, with a wide variety taking center stage in dishes throughout the region.  While there is some cultural variation, eggplant, artichokes, squash, tomatoes, legumes, onions, mushrooms, okra, cucumbers, and a variety of greens and lettuces all flourish in this region and are commonly used.  Vegetables appear in dishes in a variety of forms: baked, roasted, sautéed grilled, puréed, and served fresh in salads. Meat is used more sparingly.

Mediterranean cuisine is broken up into three distinct regions. Eastern. Southern and North African. Eastern cuisine, describes the culinary traditions of Greece, Turkey, Syria, Lebanon, Israel, Palestine, and Egypt.  The flavors of parsley, sumac, mint, and lemon juice dominate the Eastern Mediterranean cooking palate, while pomegranates and nuts are regular ingredients in sauces and spreads.  Grains take the form of rice or flat breads like pita and lavash, and don't forget the great yogurt and fresh cheeses like feta. 

Southern European cuisine, which is found in Italy, Southern France, and Spain, contains wine enhanced recipes with bold flavors. Pork is also consumed more by these countries than the rest of the Mediterranean, and is more prevalent than goat, mutton, or lamb.  Tomatoes, garlic, capers, anchovies, mustard, anise, and pine nuts are used in a variety of combinations to flavor Southern European dishes.  A multitude of different grains are consumed: leavened breads, pasta, and rice are staples.

North African cuisine is characterized by an abundant use of spices. Morocco, Algeria, Tunisia, and Libya all regularly use cumin, coriander, saffron, cinnamon, cloves, chilies, saffron, and paprika. Dried fruit like dates, apricots, and raisins make frequent appearances in North African cuisine, both on their own and in cooked dishes. Lamb, goat, chicken and lots of slow cooked stews and meat dishes. Very aromatic. 

Regardless of which region you like the best, they all offer something very special to the world, taste! A taste that makes you remember your childhood and the gatherings of family and friends and that crazy aunt with the hairy mole. 

Mangia! Mangia!

Mixed Vegetable Pancakes - Waffles is a popular Indian Snack 
Kid Approved Veggie Pancakes
1 cup rice, cooked
6 green onions, sliced
2 carrots, shredded
1/4 cup parsley
2 clove garlic, grated
2 eggs
2 tbs flour
Salt and pepper to taste
Olive oil for cooking

Combine the rice, onions, carrots, parsley, garlic, and flour in a large mixing bowl, stirring to combine thoroughly. Beat two eggs in a separate bowl and add to the mix. Combine.
Form into palm-size patties. Heat olive oil in a fry pan and cook the pancakes so they’re brown and heated through, about five minutes per side. Season with salt right after removing them from the pan.

This next recipe is a fun one for the kids. They can help assemble them and be apart of the process. 


Chicken Parmesan Sub Skewers!! Such a fun, kid-friendly dinner or appetizer idea! I love the breadsticks around the chicken! - The Cookie Rookie
Recipe and Photo Here
Chicken Parmesan Skewers
1 tube pillbury crescent rolls
1/2 tsp Italian seasoning
4 boneless chicken breasts
2 C marinara sauce, we used barilla
1 C grated parmesan cheese
1/4 C shredded mozzarella cheese
8 wooden skewers (soaked in water for 30 min) You can also use metal skewars

Place chicken in a ziplock bag or bowl with the marinara sauce and coat evenly. 
Pour parmesan cheese into bowl and dip the chicken into the cheese. 
Assemble the skewers by threading one end of the the stick with crescent dough (lengthwise) adding a chunk of chicken and then wrapping the dough around the chicken until the skewer is filled. Sprinkle each kabob with Italian seasoning.
Place skewers onto a sprayed baking sheet and bake at 400o until the chicken is browned slightly, about 20 minutes. Watch to make sure the dough doesn't burn. Turn your skewers so they evenly cook. 
Remove from oven and sprinkle with mozzarella cheese. 


IMG_7205
Recipe courtesy of chelciesfoodfiles.com
Balsamic Portobello & Cheesy Polenta
8 portobello mushroom caps
2 Tbsp balsamic vinegar (the best balsamic you can get)
1.5 Tbsp olive oil (I used lite) + 1 Tbsp separated from the other amount
course salt and pepper
1 pint of cherry tomatoes
4 cloves garlic, minced 
4 Tbsp basil walnut pesto (recipe below)
1 C polenta (corn grits)
3 C chicken or veg stock
1 tsp butter (I used vegan butter)
4 oz goat cheese


Walnut Pesto
2 C basil leaes
1/2 C toasted walnuts (you can also use pine nuts, toasted in a dry pan)
1/2 C grated parmesan cheese
2 cloves garlic
1/2 C olive oil

Combine all ingredients into your food processor and grind until combined and smooth. 

For the Balsamic Portobellos

Preheat over to 425o and line two baking sheets with a piece of tin foil. In a small bowl, whisk together 2 Tbsp balsamic vinegar, 1.5 Tbsp olive oil and a generous pinch of both salt and pepper. 
Clean the gills from the underside of your portobello mushrooms, carefully with a spoon. Baste and coat each mushroom with the mixture and place the mushrooms side up on one baking pan. 
On the other baking sheet toss together your cherry tomatoes, garlic, and 1 Tbsp of remaining olive oil and also season with salt and pepper. 
Roast both pan in the oven for 25 minutes. Make sure the oven racks are only about 1 inch apart and place the mushrooms on the bottom rack. 
While the veg is roasting, heat a stock pot on the stove and bring 3 cups of stock to a boil Add in the polenta grits, turn heat to love, and stir frequently while the mixture cooks. It can stick and burn if you don't watch it closely. Stir till it thickens.
When the polenta is thickened (usually about 15 min) add your goat cheese and stir until the cheese melts in. 
Remove roasted tomatoes and portobello mushrooms from the oven and slice your mushrooms to bite sized pieces. 
Assemble your bowl or plate adding a scoop of polenta on the bottom with mushroom on top and then your tomatoes. Drizzle with walnut pesto and extra olive oil if desired.  


This next recipe is kind of a fun one. I had my son help me slice the veggies and arrange them on the puff pastry. Easy and tasty. 

Ratatouille Foccacia
 14 ounces frozen puff pastry, slightly thawed
1 eggplant
1 zucchini
1 yellow zucchini
1 crookneck squash
1 red bell pepper
Small can tomato sauce
2 tablespoons olive oil
Salt and pepper
Fresh thyme
Feta and/or goat cheese, crumbled

Preheat the oven to 375 degrees
Cover a baking sheet with parchment paper. Once the puff pastry is thawed enough to be pliable, lay it on the baking sheet. Break off rectangles of the puff pastry as needed to make it fit on the baking sheet. Prick the pastry with a fork at 1-inch intervals.
Spread the tomato sauce onto the pastry; leaving a 1-inch border at the edges.
Trim the ends off the zucchinis, squash and bell pepper. Using a mandoline or a very sharp knife, slice the vegetables into very thin pieces, about 1/16th of an inch thick.
Arrange the vegetables on top of the tart, concentrically or in rows, slightly overlapping them. You’ll probably have some left over.
Drizzle the vegetables with olive oil and salt and pepper, and sprinkle thyme leaves on top.
Bake in the oven for about 25 to 30 minutes, or until pastry is browned and the vegetables look soft.
Slide onto a cutting board and sprinkle with feta and/or goat cheese. Cut into squares or strips.
Serve warm or at room temperature.

Easy Baklava  
1 pound chopped mixed nuts
1 teaspoon ground cinnamon

1 (16 ounce) package phyllo dough
1 cup butter, melted
1 cup white sugar
1 cup water
1/2 cup honey
1 teaspoon vanilla extract
1 teaspoon grated lemon zest


Preheat oven to 350 degrees. Butter a 9x13 inch baking dish.
Toss together cinnamon and nuts. Unroll phyllo and cut whole stack in half to fit the dish. Cover phyllo with a damp cloth while assembling the baklava, to keep it from drying out.

Place two sheets of phyllo in the bottom of the prepared dish. Brush generously with butter. Sprinkle 2 to 3 tablespoons of the nut mixture on top. Repeat layers until all ingredients are used, ending with about 6 sheets of phyllo. Using a sharp knife, cut baklava (all the way through to the bottom of the dish) into four long rows, then (nine times) diagonally to make 36 diamond shapes.

Bake in preheated oven 50 minutes, until golden and crisp.

While baklava is baking, combine sugar and water in a small saucepan over medium heat and bring to a boil. Stir in honey, vanilla and lemon zest, reduce heat and simmer 20 minutes.

Remove the baklava from the oven and immediately spoon the syrup over it. Let cool completely before serving. Store uncovered. 


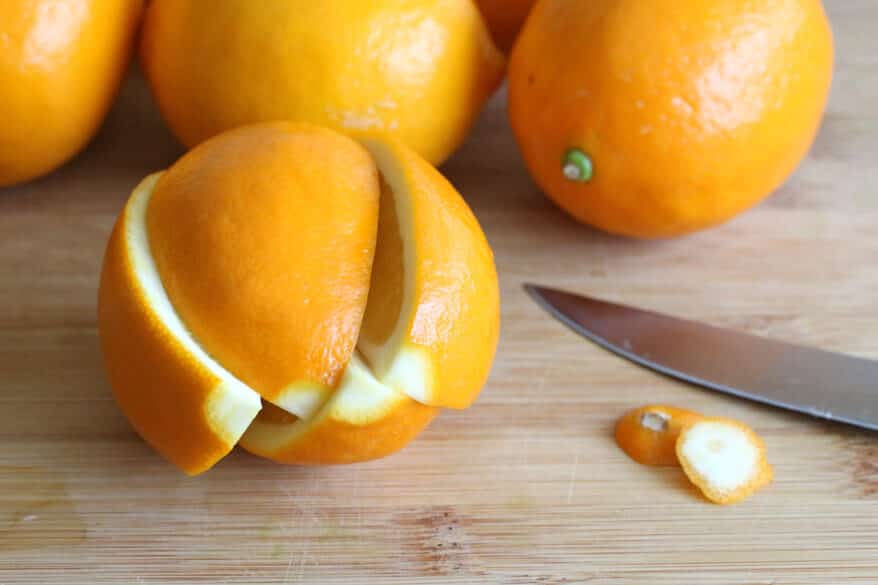
Have you ever used preserved lemons in a recipe? Boy are they good. Try preserving your own at home. Try using your preserved lemons in salads, with grains, salsa and dips, pasta and savory chicken and beef dishes. The Daring Gourmet has a step by step recipe for preserving your own lemons. They make such a great gift too.
Preserved Lemons 1 cropped lighter 
Preserved Lemons 
3 Meyer lemons* (or Eureka, Lisbon,) per pint-sized jar
5-6 teaspoons salt
An extra lemon for juicing
Water that has been boiled and cooled (sterile)

Meyer lemons are very unique and sweet, you don't have to use them in the recipe, but if you can get your hands on them, they are extraordinarily tasty.


Preserved Lemon prep 10Preserved Lemons prep 4Preserved Lemons prep 5

You can make however many preserved lemons you like, but roughly 3 will fit per pint-sized jar. Thoroughly clean the lemons. Organic is recommended. If you can't find organic, let the lemons sit in some vinegar water for a few minutes, then rinse.
Trim the nubs off both ends of each lemon. Quarter each lemon, slicing them down just over 3/4 of the way to leave the slices attached at the end.
Put one teaspoon of salt into the cavity of each lemon.
Place one teaspoon salt into the bottom of the jar. Put a lemon in the jar, cut-side down, pressing firmly to squish out the lemon juice. Put a teaspoon of salt on top of the lemon. Firmly press the second lemon down on top of the first lemon. Repeat with the third lemon, pressing down firmly. Add a teaspoon of salt on top of the lemon.
The jar should be halfway full with lemon juice. If needed, squeeze some additional lemon juice into the jar to bring it to the halfway point. Don't waste that lemon; slice it and stuff the slices into the jar. Pour the boiled/cooled water into the jar to fill it to the top.
Screw the lid on and let it sit at room temperature for 3 days, shaking it and rotating the jar upside-down/right-side up a few times per day. After 3 days transfer the jars to the refrigerator and let them sit for at least 3 weeks before using. Store in the fridge, will keep for at least 6 months.


Remember: Whatever dish you use them in, discard the pulp (it's the peel that is used) and thoroughly wash the peel to remove excess salt.
  • 1 tube pillsbury breadstick dough
  • 4 boneless skinless chicken breasts, cubed into 1 inch pieces
  • 2 cups of your favorite homemade or premade marinara sauce
  • 1 cup grated parmesan cheese
  • ¼ cup shredded parmesan cheese
  • 8 wooden or metal skewers (is using wooden, soak in water for 30 minutes before placing on grill or putting in the oven)
Instructions
  1. Place chicken in a ziplock bag or bowl with the marinara sauce and coat completely
  2. Pour parmesan cheese into medium sized bowl. Take each piece of chicken and dredge in parmesan cheese, coating completely
  3. Assemble your skewers by threading one end of breadstick dough, then a piece of chicken, then wrapping with breadstick, followed by another piece of chicken, and repeating until you reach the end of your breadstick dough. For me it wrapped around 3 cubes of chicken.
  4. Grill for about 10 minutes on each side, or bake in the oven for 20 minutes at 400 (less depending on thickness of chicken)
  5. Take off of the heat and sprinkle with mozzarella
- See more at: http://community.epicurious.com/post/chicken-parmesan-sub-skewers#sthash.5asWvkxm.dpuf